Including JavaScript libraries in your project

There’s a huge amount of JavaScript code available on the net. If you need a special function that isn’t already in NS Basic/App Studio, chances are that someone has written it in JavaScript and made it available for download. It’s easy to add this code to your project.

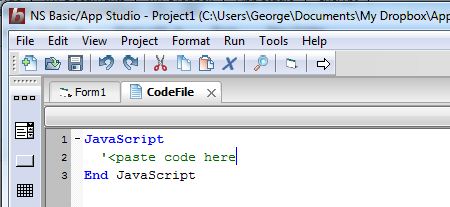
First, from the Project Menu, choose Add New Code File and enter in JavaScript…End JavaScript:

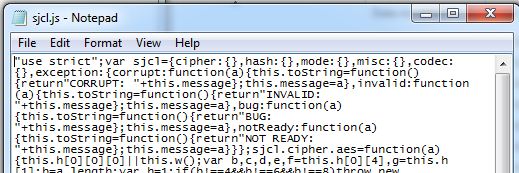
Next, let’s get the JavaScript code and open it in NotePad. For this post, we’re going to use the Stanford JavaScript Crypto Library. Here’s what it looks like in NotePad:

Not very readable: it has been minimized. No matter for us – we don’t have to read it to use it. Copy the complete text and paste it in between our lines of code. Delete the “use strict”; at the start of the line.

Finally, let’s name our new code file something useful:

The library is now part of your project. We will cover actually calling it in the next blog post (it’s easy!), but to finish this one off, let’s discuss how to reuse this code file in another project.

Under the File Menu, choose Export Current Form/Code… This will save the code file as a separate .cod file.

To load a .cod file into your project, choose Add Existing Code File… from the Project menu:

The code module will be added to your project. .COD files are a handy way to share code. If you have a good one, feel free to save it to the Files section of the web board.

Note: Be respectful of any license restrictions on the code snippits you use. Sometimes it’s as simple as including the author’s name in a comment. Sometimes you’re not allowed to use the code in an app you sell. It’s wise to follow the author’s request.

JSON – A cool way to transfer data!

One of the enhancements in NS Basic/App Studio 1.2.4 was the addition of JSON support. If you want the full details on what JSON is, read about it on Wikipedia. For our purposes, it is a fast way to wrap up a bunch of data up so it can be transmitted or received.

Using JSON, you can take a data structure or a complete SQLite database and turn it into a string which you can send to another system using HTTP POST or WebSockets. You can also receive a string the same way, which you can then turn into active data in your program or save to SQLite. You can also use JSON to encode a database which can then be installed with your app. Your app can read it in and construct the database.

It’s fast. We did a benchmark where we created an SQLite database with 20,000 customer address records. Exporting that database to JSON on an iPhone 4 took just over 1.1 seconds. Importing 1,000 records to a new database took 2.2 seconds. Tests on an Android Nexus S were also fast: import in .851 seconds and export of 20,000 records in 3.8 seconds. It’s quite practical to use on large files.

Here is how to export an SQLite database using JSON:

Function JSONExport()
  Dim i
  recs=DBRecords.rows.length
  Dim data(recs)
  For i=0 To recs-1
    data[i]=DBRecords.rows.item(i)
  Next
  JSONExport=JSON.stringify(data)
End Function

What this code does is to copy the database into an array, with one element for each row of the database. The JSON.stringify() function converts it all to a JSON string.

Here is some code which imports an SQLite database:

Function JSONImport()
  Dim data, sqlList, q
  file=ReadFile("customers.json")
  data=JSON.parse(file.responseText)
  DB = SqlOpenDatabase("customers.db","1.0","My Customer Database")
  q=Chr(34)
  If DB<>0 Then
    sqlList=[]
    sqlList[0]=["DROP TABLE customerData;",,skipError]
    sqlList[1]=["CREATE TABLE IF NOT EXISTS " & "customerData('name', 'address1', 'address2', 'age', 'sales', PRIMARY KEY('name') );"]
    
    For i = 0 To UBound(data)-1
      Name    = q & data[i].name & q
      Address1= q & data[i].address1 & q
      Address2= q & data[i].address2 & q
      Age     = data[i].age
      Sales   = data[i].sales
      s = Join([Name, Address1, Address2, Age, Sales],",")
      sqlList[i+2]="INSERT INTO customerData (name, address1, address2, age, sales) VALUES ( " & s & ");"
    Next
 
    sqlList[i+2]=["SELECT * from customerData ORDER BY name;", dataHandler]	  
    Sql(DB, sqlList)
  End If  
End Function

The ReadFile in the third line is interesting. “customers.json” is a file that is included in the project’s manifest and deployed with the project. ReadFile() reads the entire file in.

The fourth statement does all the work. It takes the data that was read in and turns it into an array, with one element per row. From there, it is straightforward to process it and add the records into the SQLite database.

You can try this sample out: it is called SqlSample1, and it is installed with NS Basic/App Studio starting with 1.2.4.

If you are curious about the format of the JSON file, here’s a sample:

[{"name":"Customer0","address1":"0 Winding River Lane","address2":"Anytown USA 100000","age":32,"sales":56025},{"name":"Customer1","address1":"1 Winding River Lane","address2":"Anytown USA 100001","age":75,"sales":86082},{"name":"Customer10","address1":"10 Winding River Lane","address2":"Anytown USA 1000010","age":23,"sales":52976},{"name":"Customer100","address1":"100 Winding River Lane","address2":"Anytown USA 10000100","age":87,"sales":26473},{"name":"Customer101","address1":"101 Winding River Lane","address2":"Anytown USA 10000101","age":10,"sales":45455},
...

The data is represented as an array, with one element for each row of the array. Each element is made up of a list of fieldnames in quotes and values. String values are in quotes; number values not.
Using Facebook with NS Basic/App Studio

It’s easy to get Facebook information into your NS Basic/App Studio program. Facebook has an API that is easy to access. Send a message to it, and it will return the information you requested.

Here’s how to request information on Mark Zuckerberg:

$.getJSON("https://graph.facebook.com/MarkZuckerberg", "callback=?", gotJSON)

A bit of explanation is in order.
The $.getJSON() function is in an external library named JQuery. JQuery is a very popular library for JavaScript developers. Fortunately, it can be called from NS Basic/App Studio quite easily. Simply put the following into your project’s “extraheaders” property:

<script type="text/javascript" src="https://ajax.googleapis.com/ajax/libs/jquery/1.6.0/jquery.min.js">
</script>

(You could also download the file jquery.min.js into your project’s directory and add it to your manifest.)

The getJSON call has 3 parameters: the URL to get information from, any parameters to send to the URL, and the return function. In this case, we want to get information about Mark Zuckerberg.

When it comes back, we want the function gotJSON to be called on our program. This is an asynchronous operation: your program can continue to run while we wait for graph.facebook.com to reply. When it does, our function is called.

Here is what gotJSON looks like:

Function gotJSON(data)
  If data["error"] Then
    txtData.value = data.error.message
  Else
    txtData.value = ""
    For Each index, item in data
      txtData.value = txtData.value & index & ": " & item & vbCRLF
    Next
  End If
End Function

The data is returned as a JSON object, which ) is a lightweight text-based open standard designed for human-readable data interchange. What’s left to do is to display the object. Taking advantage of For Each’s ability to iterate both the names and the values of each member of the object, we output one line for each member. Here is the output:
facebook

For more information on the Facebook API, see http://developers.facebook.com/docs/reference/api/.

How to print from your app

You can print the current screen contents from your app using the statement

window.print()

For this to work from an iOS device, you will need to be connected by WiFi to a network with a properly configured printer. For example, if you are connected to a Mac running Mac OS 10.6, you can print to any AirPlay enabled printer.

While Apple has only a short list of AirPlay printers built in, almost any printer connected to the network will work if you run Air Printer Lite or Air Print Activator on the system.

jQuery Mobile 1.4 adds some extra styling which can interfere with printing a full page. Here is the workaround:

Function btnPrint_onclick()
  Dim h = Page_PrintTest.style.minHeight
  Page_PrintTest.style.minHeight = ""
  window.print()
  Page_PrintTest.style.minHeight = h
End Function

Using Sencha Touch with NS Basic/App Studio

Sencha Touch is a JavaScript framework which can be used to add additional functionality to NS Basic/App Studio. It has a number of slick features and controls. Complete documentation is at http://dev.sencha.com/deploy/touch/docs/. One thing to keep in mind: it’s quite large, adding almost 500K to your project.

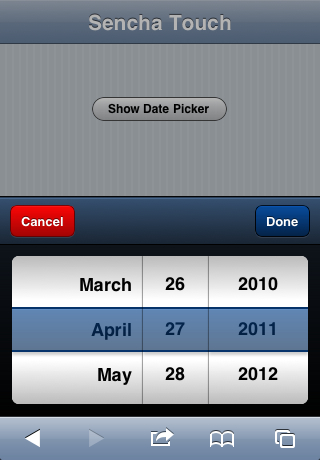
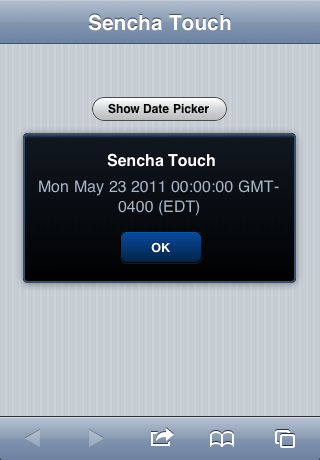
Let’s use it to create a Date Picker that looks like this:

Start by adding the Sensha .css and js files into your project folder. Add this to your project’s extraheaders property:
<link rel="stylesheet" href="sencha-touch.css" type="text/css">
<script type="text/javascript" src="sencha-touchcompressed.js"></script>

Add this to your project’s manifest:
sencha-touch.css
sencha-touchcompressed.js

Now, we’re ready to code. First thing we need to do is set up a reference to Sencha’s DataPicker object. All of Sencha’s functions are wrapped in a single object named Ext. To call any Sencha function, you therefore put “Ext.” in front of it:
datePicker = new Ext.DatePicker({yearFrom:2010, yearTo:2015})

Next, we want to tell datePicker what to do if the value of our datePicker changes. Sencha has a handy function for that: the following statement will call the showDate function in our program when this happens:
datePicker.on("change", showDate)

We’ll need a button to open the datePicker window. Add one to the project and put the following code for onclick. The first statement sets the initial date for the picker as today. The second one shows the DatePicker as a modal dialog.
Function Button1_onclick()
  datePicker.setValue(new Date())
  datePicker.show()
End Function

Now we just have to add the function that gets run if the user changes the date. We’ll just display it on the screen. An NS Basic/App Studio MsgBox statement could do this well, but since we’re showing off Sencha, let’s use their fancy one:
Function showDate()
  Ext.Msg.alert("Sencha Touch", "Date Entered is " & datePicker.getValue(), Ext.emptyFn)
End Function

Here is all the code in one listing:

datePicker = new Ext.DatePicker({yearFrom:2010, yearTo:2015}
datePicker.on("change", showDate)

Function Button1_onclick()
  datePicker.setValue(new Date())
  datePicker.show()
End Function

Function showDate()
  Ext.Msg.alert("Sencha Touch", "Date Entered is " & datePicker.getValue(), Ext.emptyFn)
End Function

This sample is included in the NS Basic/App Studio Samples folder starting in version 1.2.2.

There’s a lot more to Sencha Touch than this. If you discover any good tips or tricks, let us know so we can share with everyone!

Calling a function in your app from HTMLview

NS Basic/App Studio’s HTMLview is a powerful control. It allows you to display HTML formatted content in your app.

HTML can include links to other pages. But it can also be used to execute code. Here’s how to have a link in an HTMLview control call a function in your program.

First, set up a function in your program that you want to call:
Function MyFunction()
    MsgBox "MyFunction called.
End Function

Put this in the innerHTML property of your HTMLview. You can do this in the IDE or at runtime:
<a href='javascript:MyFunction();>
    Text to click
</a>

Now, run it in Chrome or on a device. (The link will display as a link in the IDE, but it won’t do anything). Clicking on the link will bring up the MsgBox.

You can do some amazing stuff with this. You could create an object with much more complexity than the IDE itself lets you do – for example, a scrolling listbox with custom formatting on each line. You could even use BASIC to create your own HTML from your data, then set the HTMLview to show it.

Multiple overlapping windows in IDE

Version 1.2 lets you tear off the items in the tab bar into their own windows. This is handy if you want to edit code and see the form at the same time, or view more than one code window at a time. Drag a tab outside the bounds of the IDE to make this happen.

Here’s how it looks afterwards:

Images in strings and Base64

Images can be saved as strings encoded using Base64. This can be quite useful. For example, you can pass such strings from a server to your app, or store them in an SQLite database. Here’s an example of a png file with an image of a red dot, represented as a string:

reddot="data:Image/png;base64,"
reddot=reddot & "iVBORw0KGgoAAAANSUhEUgAAAAoAAAAKCAYAAACNMs+9AAAABGdBTUEAALGP"
reddot=reddot & "C/xhBQAAAAlwSFlzAAALEwAACxMBAJqcGAAAAAd0SU1FB9YGARc5KB0XV+IA"
reddot=reddot & "AAAddEVYdENvbW1lbnQAQ3JlYXRlZCB3aXRoIFRoZSBHSU1Q72QlbgAAAF1J"
reddot=reddot & "REFUGNO9zL0NglAAxPEfdLTs4BZM4DIO4C7OwQg2JoQ9LE1exdlYvBBeZ7jq"
reddot=reddot & "ch9//q1uH4TLzw4d6+ErXMMcXuHWxId3KOETnnXXV6MJpcq2MLaI97CER3N0"
reddot=reddot & "vr4MkhoXe0rZigAAAABJRU5ErkJggg=="

To display in an Image Control, do this:

Image1.innerHTML="<img height=10 width=10 src='" & reddot & "'/>"

To display in the PictureBox control: do this:

reddotImg=new Image()
reddotImg.src=reddot
pb = PictureBox1.getContext("2d")

Function redditImg_onload()
  pb.drawImage(reddotImg,0,0)
End Function

You can save a Picturebox to a string using the PictureBox.toDataURL() function.

Creating controls on the fly

It’s possible to create controls at runtime. This can be useful if you want to display some information temporarily without affecting the current form. The control gets created completely through code, which is certainly not as nice as having the IDE do it for you, especially with more complex objects.

In this example, we’ll create a div object. Div is one of the simplest elements that lies underneath NS Basic/App Studio objects. In fact, the HTMLView control is actually just a simple div.

Here’s the code:

  Dim newdiv
  newdiv = document.createElement("div")
  newdiv.setAttribute("id", "myNewControl")
  newdiv.style.position = "absolute"
  newdiv.style.width = "200px"
  newdiv.style.height = "40px"
  newdiv.style.left = "55px"
  newdiv.style.top = "200px"
  newdiv.style.background = "white" 
  newdiv.style.border = "1px solid #000";
  document.body.appendChild(newdiv)

Now we can set its value just like we would an HTMLview:

  myNewControl.innerHTML="My new control"

To get rid of the control, do the following:

  myNewControl.parentNode.removeChild(myNewControl)

The CreateDiv sample is included starting with NS Basic/App Studio 1.1.3.

Edited 3/28/16 – fixed some errors in code

How to capture signatures and drawings

It’s easy to capture and display signatures and drawings.

It’s all done using the PictureBox control. From the time the user touches the screen till the time he lifts his finger off, events are sent with the x,y coordinates. If we capture these into an array, we can display the same image again. Here is how to capture the events into an array:

Function PictureBox1_ontouchstart()
  addSegment(event.touches[0].pageX,event.touches[0].pageY)
End Function

Function PictureBox1_ontouchmove()
   addSegment(event.touches[0].pageX,event.touches[0].pageY)
End Function

Sub addSegment(x,y)
  points=points+1
  arrPointsX(points)=x
  arrPointsY(points)=y
  drawSignature(arrPointsX, arrPointsY) 'update the display in real time
End Sub

Here is how to display the signature or drawing from the array:

Sub drawSignature(pointsX, pointsY)
  pb = PictureBox1.getContext("2d")
  pb.strokeStyle = vbBlack
  pb.beginPath()
  pb.moveTo(pointsX[0],pointsY[0])
  For p=1 To UBound(pointsX)
     pb.lineTo(pointsX[p],pointsY[p])
  Next
  pb.stroke()
  pb.closePath()
End Sub

This could be made more efficient by drawing just the latest segment if we are going to call it after each event.

To put the array into a field which could be saved in a SQLite database, do this:

signatureListX=join(arrPointsX)
signatureListY=join(arrPointsY)

When you read in the signature, simply reverse the process:

arrPointsX=split(signatureListX)
arrPointxY=split(signatureListY)

You may be able to come up with more efficient ways of storing the data, but this isn’t bad. The above image is made up of 84 points, so the signature will be saved in less than 700 bytes.

The Signature sample is included starting with NS Basic/App Studio 1.1.3.